Featured Post

We've moved to tex.my!

It’s been great writing on Blogger.com, but we’ve decided to move to a new platform, thanks to some valuable help from a great, great friend...

Sunday, January 17, 2010

Front and Back Covers (and ISBN Bar Codes)


Sorry this post is so late after the last one, it was hard finding time to write between work and a toddler. We're drawing to a close for this bookdesign series now... just as we're starting a new year.

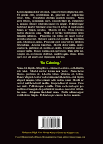
I'm not very imaginative, nor am I a graphic designer. So for my book cover, I go for a huge title across the top, a background illustration, and author/editor and publisher information at the bottom. Yes, very boring, but playing it safe — I think with a careful choice of fonts, colours and illustration, the end result wouldn't look too bad at all. :) I personally find the wallpaper package very handy for the cover page. So it might go something like this:

%% No header nor footer on the cover
\thispagestyle{empty}

%% Cover illustration
\ThisLLCornerWallPaper{1}{grapes-in-my-studio-little-too-much-dust}

%% Bar across the top
\tikz[remember picture,overlay]%
\node[fill=Sienna,text=white,font=\LARGE\bfseries,
text=Cornsilk,minimum width=\paperwidth,
minimum height=5em,anchor=north]%
at (current page.north){Exercises in \LaTeX};

\vspace*{2\baselineskip}

{\bfseries\itshape\color{LightGoldenrod!50!Gold}
\fontsize{36pt}{46pt}\selectfont
The Wonderful Calmness\par
of Still Life Photos\par}

\vspace*{2\baselineskip}

{\LARGE\color{LightGoldenrod}
A small dummy example book by
\scshape{Curutari}\par
}

\tikz[remember picture,overlay]%
\node[fill=Sienna,font=\LARGE\bfseries,
text=Cornsilk,minimum width=\paperwidth,
minimum height=3em,anchor=south]%
at (current page.south) {Malaysian \LaTeX\ User Group};

\begin{center}
\LARGE\bfseries\color{SaddleBrown!30!black}

\end{center}

%% Clear to next odd page
\cleardoublepage


Then comes the back cover. Now if the book is published with an ISBN, you'd want to put a bar code for it. I was wondering where I could get a free bar code generator, when a gut instinct told me to look around CTAN for a LaTeX solution. And sure enough, the ean13isbn package does the trick without any hassle:

%% In preamble
\usepackage[ISBN=978-80-85955-35-4]{ean13isbn}

...

%% Print the ISBN bar code
%% See the documentation for other sizes e.g. SC0, SC1...
\EANisbn[SC4]


So here's the code for my backcover:

%% Temporarily enlarge this page to push
%% down the bottom margin
\enlargethispage{3\baselineskip}
\thispagestyle{empty}
\pagecolor[HTML]{0E0407}

\begin{center}
\begin{minipage}{.8\textwidth}
\color{Cornsilk}\Large\bfseries
\lipsum[1]

\begin{center}
\huge\bfseries\sffamily\color{lime}`So Calming.'
\end{center}

\lipsum[2]

\end{minipage}
\end{center}

\vspace*{\stretch{1}}

\begin{center}
\colorbox{white}{\EANisbn[SC4]}

\vspace*{\baselineskip}

\textbf{\textcolor{LightGoldenrod!50!Gold}{Malaysian \LaTeX\ User Group \textbullet\ \texttt{http://latex-my.blogspot.com}}}

\textbf{\textcolor{LightGoldenrod}{Cover Illustration by Dusan Bicanski \textbullet\ \texttt{http://www.public-domain-image.com}}}
\end{center}


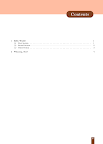
I've also added a table of contents with a simple \tableofcontents. The ToC heading is printed as a chapter heading, so I created a fancy style for it, without the chapter number and background picture, by modifying our fancy chapter code from earlier.

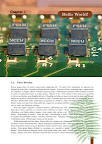
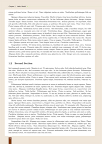
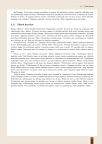
All in all, here's what our sample book now looks like (empty pages omitted):



Download links of the LaTeX code producing the above:

Illustrations courtesy of PublicDomainImage.com here, here and here; OpenClipart Project here.


Epilogue

Well it's been fun writing this series. It sure took me some time to prepare the sample code, search for appropriate illustrations and write up the posts, but I'm glad I documented how I achieved some of the effects in that Grid Computing Cluster book. Many thanks to all the readers and especially those who kept the comments section lively. You sure motivated me to finish writing this series! :D

Thursday, December 3, 2009

MikTeX 2.8 and WinEdt 5.6

Apparently WinEdt 5.6 needs some adjustments to work with MikTeX 2.8. Here are the instructions to make them work nice together (including on Windows 7), from Yu-Sung Su's blog.

Monday, November 30, 2009

Customising running headers and footers


By default, the running headers in a two-sided book (resp. article) produced by LaTeX displays the chapter (resp. section) number + title and the page number on even pages; and the page number and section (resp. subsection) number + title on odd pages. On chapter pages, however, the running header is blank, and the page number is displayed in the centre of the footer.

All these default headers and footers can be customised, either with the facilities already provided by the memoir class, or via the fancyhdr package. Basically, you need to redefine the "plain" pagestyle for chapter pages, and the "headings" pagestyle for the non-chapter pages. Using memoir, you'd do something like

\makeevenhead{plain}{left}{centre}{right}
\makeoddhead{plain}{left}{centre}{right}
\makeevenfoot{plain}{left}{centre}{right}
\makeoddfoot{plain}{left}{centre}{right}

% respectively \makeevenhead{headings}...

While if you're using the fancyhdr package:

\fancypagestyle{plain}{
  %% Clear all headers and footers
  \fancyhf{}
  %% e.g. if right footers on odd pages and left footers
  %% on even pages are some content:

  \fancyfoot[RO,LE]{...}
  %% this applies to right headers on odd pages:
  \fancyhead[RO]{...}
  %% and this to left headers on even pages:
  \fancyhead[LE]{...}
  %% and this to centre headers on both even and odd:
  \fancyhead[C]{...}
}

\fancypagestyle{headings}{...}

As always, see the respective manuals/user guides for extensive instructions.

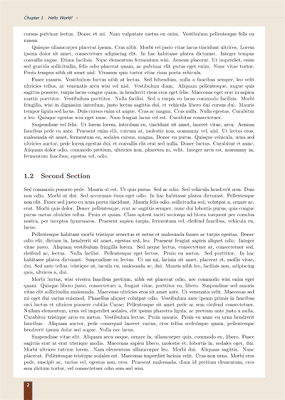
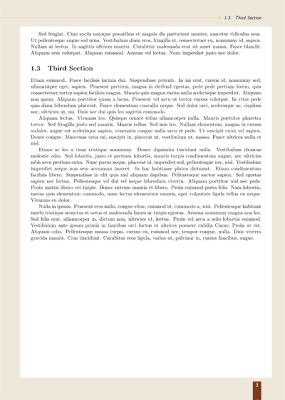
Here are some examples of what I've done:


(Download links of the .tex source files are at the end of this post)

Here are my specs:
  • On chapter pages:
    • page number in a coloured box on the right in the footer on odd pages;
    • ditto, but on the left in the footer on even pages;
    • blank running headers.
  • On non-chapter pages:
    • same footers as above;
    • on even pages, the chapter title on the left in the header, and a decorative line extending to the right all the way to the paper margin;
    • on odd pages, the section title on the right in the header, and a decorative line extending to the left all the way to the paper margin.
I used the tikz package for the coloured box containing the page number, as well as the decorative lines in the header.

You'll probably notice that on the non-chapter pages, I've got some coloured background going on, too. I could've used the wallpaper package to achieve this effect, but just for kicks, I did them using the tikz package, using the headings pagestyle as a hook.

So here are the .tex source (plus the public domain images used) for producing the sample pages above:
Note that my examples require wallpaper.sty v2.5. If you're using MikTeX, your wallpaper.sty is most likely v2.4, so you'll have to grab the latest version yourself.

Saturday, November 7, 2009

Fancy Chapter Headings


If you look at my post that started this series, you might notice that the first page of every chapter in the Grid Computing Cluster report is rather fancy. I've initially got my inspirations from Stefan Kottwitz's post on 'Fancy chapter headings with TikZ'.

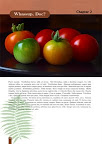
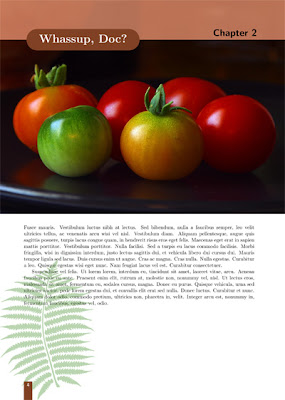
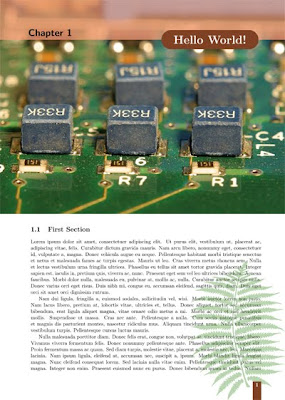
Here are the samples of how the chapter pages would look like:


(Download links of the .tex source files are at the end of this post)

The chapter number and title are rendered with TikZ, similar to what's described in Stefan Kottwitz's post. I threw in a background image across the top of the page, and another one at the lower corner, using the wallpaper package.

Just so we can choose a different image for every chapter, I defined a new command that holds the image filename (\newcommand\chapterillustration{}) and re-define it at each chapter (\renewcommand\chapterillustration{cherry-tomatos}).

Notice that the positioning of the chapter title and the fern leaf background image is different depending on whether the chapter starts on an odd or even page. The memoir document class provides the commands \checkoddpage and \ifoddpage...\else\...\fi, so that you can define what to do in each case.  Don't worry if you're not using the memoir document class, these commands are also available via the changepage package.

Now to actually implement these definitions. The memoir document class lets you define chapter styles (e.g. \makechapterstyle{FancyChap}{\def\printchaptertitle##1{...}} see the manual on "Chapter Headings" for more details) in the preamble, which you would activate in the document body with \chapterstyle{FancyChap}.

On the other hand, if you're not using the memoir document class, use the \titleformat and \titlespacing commands from the titlesec package instead.

Sorry I'm too tired to even post relevant snippets; here are the links to the .tex sources to produce the sample pages above. I've incorporated the code for Changing page size and sizes, too. (By the way I used the lipsum package to generate the dummy text. You know, Lorem ipsum dolor sit amet...)
The sample public domain images are from here (cherry tomatos), here (computer chips) and here (fern leaf).

Sunday, November 1, 2009

Using Colours in LaTeX

A brief departure from the bookdesign series, as some of my future posts within and outside the series will be dealing with the use of colours, so I might as well get it out of the way first. Summarily, we'll take a look at how to use colours in LaTeX with the xcolor package. This will work with all outputs, i.e. .dvi, .ps and .pdf.

The most useful commands for applying colours made available by xcolor are:
  • \color{color} (applies color to the text in the currrent group)
  • \textcolor{color}{text} (applies color to the specified text only)
  • \pagecolor{color} (colors the entire page to be color)
  • \colorbox{color}{text} (creates a box containing the specified text, with color as the background)
  • \fcolorbox{frame color}{bg color}{text} (same as above, but with a coloured border around the box)
See Section 2.6 of the xcolor manual for full list and more details of commands for colour application. Alternatively, if you're using emacs, you can look it up with M-x list-colors-display.

The xcolor package has quite a collection of pre-defined colours; they are listed in Section 4 Colors by Name in the manual. Apart from the 19 "base" colours that are always available, you can also access more pre-defined colours via the dvipsnames, svgnames and x11names options. Here's a quick example:

\documentclass[a6paper,12pt]{article}
\usepackage[x11names]{xcolor}

\begin{document}

% 'LemonChiffon1' from x11names
\pagecolor{LemonChiffon1}

% 'magenta' is a base colour
\textcolor{magenta}{Hello World!}

% 'CadeBlue1', 'Firebrick2' and 'Goldenrod1'
% are available via x11names
What a \colorbox{CadetBlue1}{wonderful}
\fcolorbox{Firebrick2}{Goldenrod1}{world}.
\end{document}

You can mix up your own colours, too. \color{LemonChiffon1!80} means 80% LemonChiffon1 and 20% white, while \color{lime!30!yellow!60!Mahogany} would be 30% lime, 60% yellow, and 10% Mahogany. You can also give names to the colours you concoct, so that you can reuse them at various points in your document. For example:

  • \definecolor[named]{CoolBlack}{cmyk}{.3,0,0,1} defines the CMYK 'Cool Black' (useful if your printer asks for CMYK black instead of 'rich black')
  • \definecolor[named]{AquaBlue2}{rgb}{.553,.769,.98} defines 'AquaBlue2' with decimal RGB values (range [0,1])
  • \definecolor[named]{Hazelnut}{HTML}{BDA59B} defines 'Hazelnut' with HTML RGB values. Useful if you're re-using colour definitions from CSS styesheets.
If you're like me i.e. you just can't hit the right figures to get a colour just right, head over to COLOURlovers for lotsa inspirations and colour schemes. I got almost all my colours for the Grid Computing Cluster report from this website.

Have fun and happy LaTeXing!

Thursday, October 29, 2009

Setting page size and margins

There's quite a bit of interest in the .tex code behind the Grid Computing Cluster report, but I think posting the raw code in its entirety would be a bit too overwhelming to quickly glean useful tips from it. (Also to avoid getting into any issues with my university... etc...)

So instead, I'll be doing a series of short posts on how I achieved certain effects and book design, starting with this one. It's probably faster for people to "zero-in" on what they need. ;-) Posts in this series will be tagged "book design". But before you implement your next major book project with LaTeX, do check with your printing company about the printing process used. If you'll be using on-demand laser printing, everything should go fine since the RGB colour model of your PDF should be adequate. However, if you're going with offset printing, your printing company will most likely prefer CMYK colour model to be used instead, and I haven't quite figured out how to tweak that perfectly with (pdf)LaTeX. In our case, only the book cover was printed with offset printing, and the effect was acceptable — so that ended well...

IMPORTANT DISCLAIMER: I am NOT a graphics designer, so my choice of colours/illustrations/etc probably sucks. Don't shoot me. :-)

Now there are multiple ways to achieve the same effect in LaTeX (that's FOSS for you). For this report, I've decided to use the memoir document class, which incorporates the functionalities of many other packages. (Do take some time to browse or search through the excellent manual with texdoc or mthelp.)

The flowfram package looks like a very interesting solution for designing dynamic layout, but I didn't find out about it until too late into my own project. Do find some time to look at it yourself. If you want to go with the standard document classes (report, book) or the koma-script classes, I'll indicate what extra packages you'll need where relevant.

In this first post we'll just look at how (custom) page sizes and margins can be specified. Basically my page design is:

  • Stock paper size is 303mm x 216mm. The stock paper is the raw original paper that a commercial printer will print the page on, which will be trimmed down to the page size
  • Page size is A4 i.e. 297mm x 210mm.
  • The printer advised us to leave a good 10mm from the page edges around any printed text.
  • I decided the main typeblock will be 20mm from the top, bottom and spine (inner) edge of the page, and 15mm from the outer edge.
  • Also, the running header should occupy the height of a line of text, 7mm from the top edge of the typeblock. Whereas the baseline of the running footer is 7mm from the bottom edge of the typeblock.

These are not necessarily good measurements for an aesthetically-pleasing book design, but more because I was trying to strike a balance between aesthetics and to fit everything in (Lesson: Get in touch with the printing company early to check with their printing specifications per minimum page margins, etc!)

These can be implemented using commands from the memoir class. (The notion of 'stock', although a common concept in publishing and printing industries, is only available in memoir, not in the standard document classes.)

\documentclass[twoside]{memoir}

%% The stock paper size
\setstocksize{303mm}{216mm}

%% The 'real' page size
\settrimmedsize{297mm}{210mm}{*}

%% The stock paper will be trimmed 3mm from the
%% top edge and 3mm from the left edge

\settrims{3mm}{3mm}

%% Spine and trim page margins from main typeblock
\setlrmarginsandblock{20mm}{15mm}{*}

%% Top and bottom page margins from main typeblock
\setulmarginsandblock{20mm}{20mm}{*}

%% Header occupies height of a single line;
%% Bottom edge of footer is 7mm from bottom edge
%% of typeblock

\setheadfoot{\baselineskip}{7mm}

%% Bottom edge of header is 7mm from top edge of
%% typeblock

\setlength\headsep{7mm}

%% Apply and enforce layout
\checkandfixthelayout


In my case, due to some later issues with colouring the 3mm bleeding edges too (as per our printing company's request), I decided to make the trimmed page size the same as my stock size and increased the page margins instead:

\documentclass[twoside]{memoir}

%% Custom stock paper and page size
\setstocksize{303mm}{216mm}
\settrimmedsize{\stockheight}{\stockwidth}{*}

%% Adjust margins accordingly to achieve
%% same previous layout

\setlrmarginsandblock{23mm}{18mm}{*}
\setulmarginsandblock{23mm}{23mm}{*}

\setheadfoot{\baselineskip}{7mm}
\setlength\headsep{7mm}

\checkandfixthelayout


If you just need to print on exactly A4-sized paper, you can forget about setting the stock and trimmed size explicitly and just do

\documentclass[a4paper,twoside]{memoir}

\setlrmarginsandblock...
\setulmarginsandblock...
...
\checkandfixthelayout


One last thing: if you're not using the memoir class, you can still change the page margins via a high-level interface with the geometry package:

\documentclass{article}
\usepackage{geometry}
\geometry{
   paperwidth=216mm, paperheight=303mm,
   left=23mm,  %% or inner=23mm
   right=18mm, %% or outer=18mm
   top=23mm, bottom=23mm,
   headheight=\baselineskip,
   headsep=7mm,
   footskip=7mm
}


Again, if you're just going to print on A4 (or letter) paper, you can just do
\usepackage[a4paper]{geometry}
\geometry{
   left=20mm,  %% or inner=20mm
   right=15mm, %% or outer=15mm
   top=20mm, bottom=20mm,
   headheight=\baselineskip,
   headsep=7mm,
   footskip=7mm
}


i.e. just pass the a4paper option to the geometry package; there's then no need to set the paper height and width explicitly.

Wednesday, October 28, 2009

Unfolding vim-latex fold

I don't know about you guys but I found it is very annoying to have my sections and subsections to be folded in vim/gvim , since somehow I mistakenly put "i" since I want to change to insert mode to unfold (although it should be :za) .

So now, the cruelest method is by

:set foldlevel = 5

usually I put 10 heh.

(since section,subsection and subsubsection may =3 .. so play safe with above that level).

But so far I did not managed to get it work by putting in in $HOME/.vimrc . Any hints?